To Check CPU Cores – Understanding the performance of your Linux VPS (Virtual Private Server) is crucial for optimizing its operation. One of the key metrics to monitor is the number of CPU cores available. This information can help you assess your server’s processing power and ensure that it meets the demands of your applications and website.
In this blog post, we’ll cover several quick and easy methods to check the number of CPU cores on your Linux VPS.
To Check CPU Cores
1. Using the lscpu Command
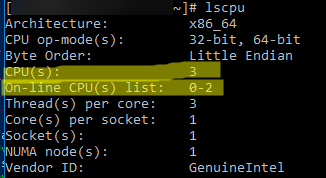
The lscpu command provides a detailed summary of the CPU architecture on your system, including the number of CPU cores. This is one of the easiest ways to get an overview of your system’s processor.
To check your CPU cores, simply open your terminal and run the following command:
Look for the “CPU(s)” line in the output. This shows the total number of cores on your system.
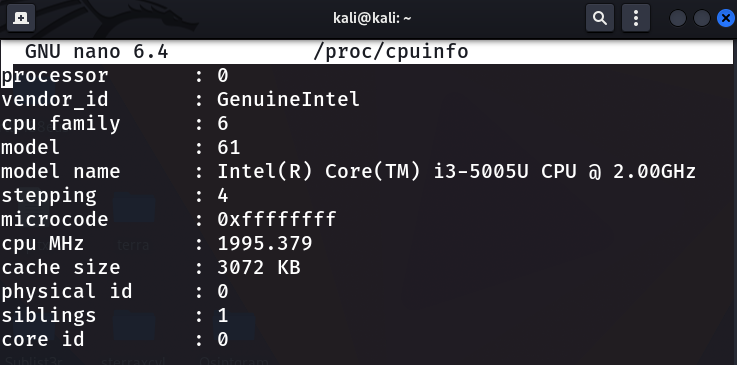
2. Checking /proc/cpuinfo
Another reliable way to find the number of CPU cores on a Linux VPS is by inspecting the /proc/cpuinfo file. This file contains detailed information about the CPUs on your system, including the number of cores.
To check the CPU details, run the following command:
Scroll through the output and count the occurrences of the “processor” field. Each processor entry corresponds to a core, so the total number of occurrences tells you how many CPU cores are present.
Alternatively, to get a more concise count of the number of cores, you can use this command:
This command will return the number of cores directly.
3. Using the top Command
The top command is another tool to check your system’s performance and resource usage. It provides a dynamic, real-time view of your system’s processes, but it also offers information on CPU utilization.
To check CPU information, run:
While in the top view, press 1 (the number 1 key). This will display the CPU usage for each individual core. You can then count the number of CPU graphs shown to determine the total number of cores.
4. Using nproc Command
The nproc command is a simple way to check the number of processing units (CPU cores) available on your system.
To find the number of CPU cores, run:
This command will return the exact number of cores on your system. It’s a quick and direct way to get the information you need.
5. Using htop (Advanced View)
For users who prefer a more interactive and visually appealing tool, htop is an enhanced version of top. It provides an easy-to-read, real-time display of your system’s resource usage, including CPU cores.
To install htop (if it’s not already installed), use the following command:
Once installed, simply run:

htop
In the htop display, you’ll see a graphical representation of each CPU core. The number of CPU bars corresponds to the number of cores, making it easy to identify your system’s processing power at a glance.
6. Using dmidecode Command
For a more detailed, hardware-specific approach, you can use dmidecode to fetch the CPU information. This tool retrieves hardware-related details directly from your system’s BIOS.
Run the following command to get information about your CPU:
In the output, look for entries like “Core Count” or “Socket Designation” to get the number of cores.
Conclusion
Knowing how many CPU cores your Linux VPS has is essential for understanding its performance capabilities. Whether you’re optimizing resources or planning to scale, this knowledge allows you to make informed decisions about your server configuration.
In this blog post, we covered six quick and easy ways to check the number of CPU cores on your Linux VPS, from simple commands like lscpu and nproc to more interactive tools like htop. Choose the method that best fits your needs and get the most out of your Linux VPS!
Let us know in the comments if you have any other tips or questions about managing your VPS performance!